This week I finished the decking in that the overlap of the ply on the framework was trimmed (routed) off.
What is interesting about the decking is its cross-sectional contour - exactly opposite to a normal boat where the profile is flat or convex down - mine being convex up. This profile is not of particular interest for motor vessels but very pertinent for small sailing craft which on long tacks will have a more level standing platform on the windward side - so helpful in travailing the vessel under way. Also the curvature of the deck in this way makes it exceptionally strong and stiff offering in its own way a complete member to the boat's structure.
The other thing I am doing to finish the gunwhale region is running a length of triangular shaped meranti on the edge of the gunwhale to offer a positive toe-hold both for both lee and windward sailing. What is a challenge for boat builders is bending wood. A particular challenge here is to bend these triangular in section lengths. What happens is they 'jump' out of place to find the easiest lie - here not being what is wanted.
The mounting of the keel housing has been boxed in - the struts to the hull being a serious source of injury if they were not so boxed. The boxing offer too a platform and compartment at the same time and its top will be nearly though not quite a continuation of the floor of the boat that has yet to be finished. Of course the lids of the box can be opened quickly up from the centre as an inspection hatch - important because the stresses on the keel, especially if going aground or hitting rocks etc could make that area of the hull bottom tear open or split.
Thursday, December 8, 2011
Thursday, December 1, 2011
Cabin Window Detail
I chose Perspex for the cabin windows because of flexibility and safety and workability as well. At 6mm of thickness it is easy to cut on the bandsaw and a linisher used carefully makes the edges tidy if slanting is needed.
I might just touch on a matter of boredom in fitting the windows is that they are framed up and the trim added only to be disassembled later to allow sealing and painting of the infrastructure and surrounding deck.
Certain psychological issues arise when a project is long drawn out. and many of which can be related to the nature of what is proposed.


Unlike the right angled nature of cabinet building boat crafting has complex angles


I might just touch on a matter of boredom in fitting the windows is that they are framed up and the trim added only to be disassembled later to allow sealing and painting of the infrastructure and surrounding deck.
Certain psychological issues arise when a project is long drawn out. and many of which can be related to the nature of what is proposed.
Here I set out to build a large model of a smaller model that worked well. I approached the test tank people in Southampton and they priced testing a 3ft model at £2000. Foolishly I thought for that sort of money that I could build a large one which I could actually be a passenger to do real testing. In reality I was sort of correct in terms of materials incorporate in the boat but optimism forgot the time factor and the cost of housing the project in London's expensive space.


Unlike the right angled nature of cabinet building boat crafting has complex angles


Thursday, November 3, 2011
Putting a plywood skin on the wooden bones of the deck
A task I was dreading was decking and the attendant 'hardship' of making patterns from thin hardboard to develop the deck panels from 9mm 5 ply, not a British Standard ply but 'Hardwood WBP ( water boil proof glue). It was suggested by the suppliers,Ferguson Timber, Acton, London, that it is likely that it is the same glue as is used in marine grade ply eg. BS 1088 except that the former's provence is not known and the layers of veneer are not of a single piece but rather assembled like a patch work quilt. This, however, is not apparent on the surface layers of the ply and the appearance was perfect. Allowing that there is a considerable price difference, that in my inexperience spoiling a sheet or two from poor workmanship or poorly cut out pattens was/is a distinct possibility and that this whole project is really something of a test bench makes using the cheaper item a reasonable choice.


----------
Here a single 2450 x 1225mm (8'x4') sheet is bent around the foredeck framwork with some difficulty in getting cramps to have points of purchase due to the overhang which was necessary to get the sheet close to the underlying frame. I suppose I could have use a Spanish windlass but found a stout rope around the sheet and the hull and its looped end over the jaws of a long friction clamp did the job and achieved the required apposition.


----------
Here interdigitating the side and foredeck panels is tricky and takes a bit of patience getting a reasonable fit as the hardboard pattern on the left shows. Not shown here but there was no attempt to match the ply colour as it is all going to be painted.There was no chamfering of edges here as the beam underneath was wide enough to provide a good seal for both panels.
However the junction of the deck panels, here seen in the far lower left hand conrner of the lower of the two pictures, had but a 20mm spar thereunder and so these I chamfered, fore panel overlying rear.


Wednesday, November 2, 2011
Sikaflex 291 Marine Sealant Trials And Tribulation On The Use Of
This shows the keel housing components seperate and in the order of assembly minus the bottom of the boat which will be between the housing and the lower compression plates. Both larger components are bent as best could be as to as least approach conformity with the bottom of the boat. It is the difference in conformity that require a good spread of 'filler' or sealant and the philosophy is essentially to put on more rather than less.

This shows the bottom of the boat ready to receive the housing. Cleaning is important and the maker of Sikaflex suggest that solvents leaving a residue be avoided. We used isopropyl alcohol, a good general spirit industrial cleaner. It might have been appropriate to have roughed the area with course wire wool but this was omitted. Perhaps somewhere in the back of my mind there was a worry of detritus from such cleaning getting into the proposed work.

The Sikaflex is 'toothpasted' on in runs of approx. 7mm thickness so each of the hole is surruounded.

The messy scene after bolting down with me inside and my friend under the boat. The central plates secured with 6mm ss hex head set screws/nuts and the marginal sections with 5 mm ss cuphead hex. recessed machine screws/nuts.

Pretty much the same situation under the boat. As we worked tightening the sealant bulged from the margins and from the holes yet unfilled with bolts in no uncertain manner. This Sika flex is expensive and it was a shame to see the waste but inevitable if we were to ensure filling of any potential points for water ingress.

This would logically suggest we should have worn gloves and it is advised by the Silaflex makers. However sensible gloves would have made the job impossible, given tactile finess, the shear number of scews to brought into place with attendent washer, spring washer and Nyloc nut, and the time for my friend under the boat to capture the head for me to tighten up. The work as a piece would have failed had the set time been exceeded and as it was it became quite difficult towards the last insertions of screws. Has we had cleaned our hands at short interval with mineral turps we might've not had the dreadful affliction to our hand seen here but time for that would have been lost to the job in hand. Normally the sealant is removable from the hands IF IT HAS NOT YET CURED. Thereafter one has to wait till it can be peeled or falls off from by mechanical means from attrition. Certain web advise suggested using razor blades but this did not appeal. In our case it took THREE DAYS to dissappear. We suffered no ill effects that we could ascertain though it is mentioned that skin reactions can occur. Of course the appearances made us feel like social outcasts.

Thursday, October 27, 2011
Fitting the Central Keel Housing


As the name implies 'housing' is apt in that the hefty aluminium item at the top of the first picture accommodates the keel shown in earlier posts. The space between it and the lower two plates is for the bottom of the boat, drilled and cut out to accommodate the two posts on the keel as seen in the second of the pictures.
This will now form the sandwich, brought together with stainless steel bolts and button head machine screws, with of course a healthy layer of marnine grade Sikoflex between each plate.
Interestingly the makers of this mastic recommend firm initial tightening followed by a final tightening after 24hrs.
Thursday, October 20, 2011
Getting a sense of the completed article

Having been built upside down suspended from the ceiling of the workshop mezzanine, then lowered to the
floor and turned, cabin frame added, it was most pleasing to get a view of what the boat might eventually look like.
Thursday, September 22, 2011
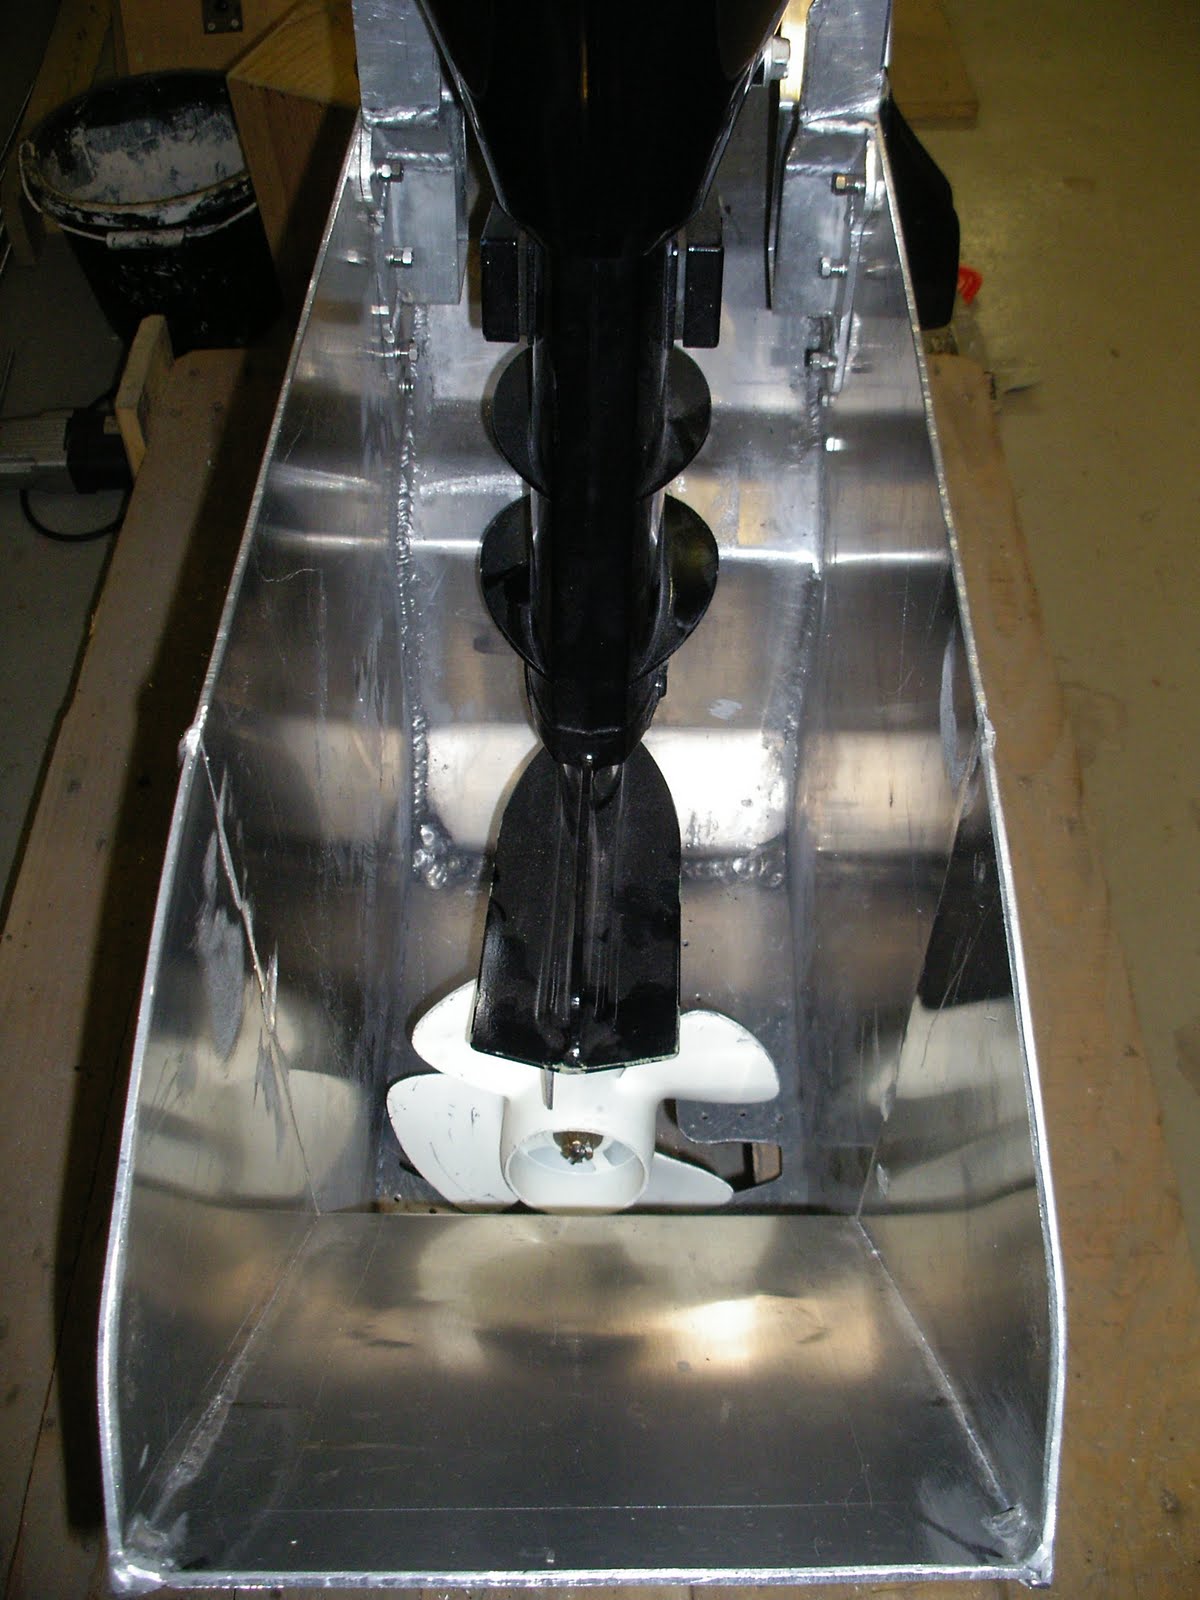
Fabricating Closure of Hole at Junction Point of Stern


A problem arising was an unwanted hole at the bottom of the hull which was the result of the aluminium sheeting inset to finish the shape of the stern and provide good support for the pintels and rudder. The size of the gap, shown in the first picture, is about that of a large kiwi fruit and is complicated in its surround by the overlappin plates and the attendant rivetting nearby.
It was tempting to just put a ball of fibre glass into the gap, work it to a good shape, and secure it with screws. However in keeping with the general nature of the hull's build I made it in aluminium. This started with a paper cut out to fit the round and angular components of the hole. This was then spread out flat and marked out on ali sheeting, formed and welded along its seams to produce a 'cup' which fits nattily over the defect.
It will be secured with rivets and a ss machine bolt and nut after being set in place on a bed of Sikaflex 291i.
Monday, July 11, 2011
The Keel Assembly

The general profile of the infra- structure of the keel and its housing in the boat is shown

The shell and one side of the two tubular locators to accommodate the lead weights that will be locked in.

The thin plate that spans the two tubes is to be riveted to the bottom of the boat and just above the flat spacer on the right will be spreaders inside the boat to distribute stresses from the keel evenly.
Tuesday, May 31, 2011
Detachable and Adjustable Keel Design for 'Paper Thin' Hulls.
The boat as may be seen from the pictures is being built in an arch rented from London Transport and the rumble of tube trains goes on over-head. The arch fronts on to a narrow alley way into which there is access through a large shuttered door.
Exiting and handling the weight of the craft when it is finished onto a low loader or trailer will be adequate but tight provided its keel is not attached.
It is the design of and the making of that keel that now poses some difficulties
- secure and watertight attachment to a ‘paper’ thin bottom
- a frame onto which a mechanism for adjustable weights in the bulb is provided
- and a general profile that embraces the reversed tear drop concept.
The hull is 2mm thick marine grade aluminium, not the heftiest to take the weight and twisting moments of 300 kg keel.
The weight will be taken by spreading the load on 10mm plates on the boat’s bottom and the twisting moment by projecting the keel well into the centre of the hull and laying off stresses there to the hull sides by means of bracketing.
Monday, May 9, 2011


Monday, March 21, 2011
Novel Additions to Rudder Steerage.

Plan view down the rudder stock showing handle which actuates attitude of the trim 'tab'.

View to show the hollow taper section of the rudder blade.

Detail of the trim tabs and a view of the ballancing 'box' from which they trail. The box section again
adding buoyancy to the whole.
The back of the boat approaches in section if not exactly in profile a likeness to a fish tail and of course with little inherent buoyancy. To solve this in some small degree I have made the bulk of the rudder blade hollow section and added horizontal trim blades to adjust the lengthwise attitude of the boat to the waterline whilst the boat is moving. It can be seen that in side elevation the boat’s adjustment in this matter will a point of rotation well forward where there is maximum flotation effect.
The adjustment of the trim blades shown here is actuated by a tubular shaft through the rudder post and on a sliding screw and handle mounting on top of the rudder post and easily accessible by the helmsman as needed.
Wednesday, January 19, 2011
Davis Wing
The use of the Davis wing shape and its subsequent limitations may turn out to be similarly applied to the tear drop shape boat in that the pressure head generated by the nose section as speeds increase cannot potentiate its energy on the tail section.
Detail of gudgeons on the hull

Two of four gudgeons demonstrating the excellent purchase on the hull, an area of detail where strength is important
Sunday, January 16, 2011
Tear Drop Concept
In previous postings I have used tear drop freely and perhaps carelessly considering that there is a good deal of contention or confusion about tear drops and rain drops as contenders for the ideal streamlined shape consider the following link.The deformation of the rain drop in its gravity driven excursion rather puts it out of the running – it would seem reasonable that it is indeed ideal for the rain drop, one fluid volume finding its way through another. Tear drop seems to be the accepted shape of a tear or drop just before its downward departure (from the face) – essentially elongate, round nosed but quickly tapering to its tail.
Patently a whole family of different tear drop shapes can be, probably has been, generated using a range of liquids with different viscosities, surface tensions and densities. From such pictorial data an integrating algorithm might give some idea what tear drop shape is best with increasing 'rigidity' in the media'. ( we don't want our form to collapse).
What I have done is just a copy of what I see as the general foot- print and lateral lines of fish, birds, and water travelling mammals. From a biological view to a down to earth practical demonstration of it we can look at the following.
Albacore was the first sub in the world to be built with the now familiar "tear drop" -shaped hull. Previous sub types had flat decks and pointed prows to maximize speed and maneuverability on the surface. In contrast, the Albacore was a cylinder with a rounded nose and a tapering tail that allowed it to move more easily while submerged. The new hull shape increased the speed of the ship under the surface dramatically. It was so quick and so maneuverable that when submerged that sailors dubbed its movements "hydrobatics."
Albacore was the first sub in the world to be built with the now familiar "tear drop" -shaped hull. Previous sub types had flat decks and pointed prows to maximize speed and maneuverability on the surface. In contrast, the Albacore was a cylinder with a rounded nose and a tapering tail that allowed it to move more easily while submerged. The new hull shape increased the speed of the ship under the surface dramatically. It was so quick and so maneuverable that when submerged that sailors dubbed its movements "hydrobatics."
Monday, January 10, 2011

Harking to my first post and my enthusiasm for the reverse tear drop shape one needs to envisage in general terms what is actually happening as that shape travels through the water.
If the viscosity of the media was considerable and elastic there would be an initial material build up across the rounded nose as penetration occurrs. The maximum diamater having broached the continuum, now finds its energy in a collar of the broached media potentiating, enabling or squigging that section behind the maximum diameter ( tale of the tear drop) forwards.
As we are in water and this being incompressable, the forward movement of that shape has to result in a displacement. and this is in the direction of least resistance, which for boats will be a collar of water on the surface. It has been found that the shape and depth of this collar is so dispersed around the bow's maximum diameter to act as in recoil and not creating an energy wasteful wake.
Sunday, January 2, 2011
Boat shape from the bow


The material for the boat is one of a 2mm 5000 series magnesium aluminiums which behaves very much like a spring plate with good recoil from modest bends and deformation. In making very small models this quality is duplicated very successfully using old X ray film.
In and under view of bow of boat

Aluminium sheet folding declaring definitive shape
Here one can see the curves in the bow of my design. The shape of the whole boat is determined by twisting a single flat sheet to enclose a volume, much in the same way as the cut edges of a radius on a disk of paper can be allowed to slid over themselves to form a cone.
The maximum curvature at any one point is singular. A right angle to the line of maximum curvature at any point is flat. And from this fundamental property of twisted planes issues the concept of losing a volume enhancing curvature, present in almost all boat design. The exceptions being where multiples of twisted or bent planes are joined, as in sheet plywood and sheet aluminium boats.
I am suggesting losing this volume containing curve (bilge) is offset by reducing the frictional surface over the whole wetted surface of the boat.
I am suggesting losing this volume containing curve (bilge) is offset by reducing the frictional surface over the whole wetted surface of the boat.
Under view of boat in progress

This picture shows a view with the bow in the foreground and the tapered stern in the background. The oak woodwork in the foreground is a construct to accommodate a cabin. The brackets seen along the gunwhale are of welded aluminuin to support the decking.
Subscribe to:
Comments (Atom)